Showing posts with label crafting. Show all posts

Thursday, May 19, 2016


Calmly Coloring
Last year, a friend at my Sit & Stitch group told us about coloring books for adults. While they’ve apparently been out for awhile, it was the first I’d heard of such books just for adults.

© June Scroggin, All Rights Reserved
So, I wandered over to Books-a-million and discovered a whole display of them in myriad choices. One entitled “Color Me Calm” was chosen along with some colored pencils. Once home again, I spent a wonderful hour on my back porch happily coloring away.

© June Scroggin, All Rights Reserved

Next, I needed something to keep my colored pencils from disappearing, so I bought a zippered pouch in which to keep them.

© June Scroggin, All Rights Reserved

Today, my local public library hosted an adult coloring event. It was so very nice. Amazing how such a simple activity helps you (at least me) relax.

Monday, February 24, 2014

DIY Portable Ironing Table

When going to sewing or quilting workshops or retreats, an ironing board is a handy tool. While ironing boards are usually provided, sometimes it’s not convenient to wait on someone who’s pressing a multitude of quilt blocks. Bringing your own is more convenient and can sit right by your work station.

© June Scroggin, All Rights Reserved

But I don’t want to bring my big board, so I made a portable ironing table from a DIY tutorial link to the Crafty Cupboard found on Pinterest. My wood folding TV tray came from Walmart and was then painted white. The fabric is a piece of medium-weight decorator fabric purchased at Jo-Ann’s.

© June Scroggin, All Rights Reserved

The tutorial was super easy—I followed it carefully and was done in no time at all. I fully believe in ironing as I sew—no matter what the project might be; doing so makes for a more polished finish. Now I’m ready for my next stitching adventure away from home.

Tuesday, January 28, 2014

Gifts for my Sorority Sisters

Whether you are young or old—friends are important and help us through life, both the good and the bad. I am blessed to be a member of Kappa Epsilon Phi—no matter how many years go by or where our lives, jobs, or interests take us in life—my sisters and I are still friends. Today, I thought I’d share a few of the projects I’ve done over the years for my sorority sisters.
After moving here from Tucson, I was teaching at the college and care-giving for my mother-in-law. I could not easily leave town, so I invited my sorority sisters to come here to the beach.

© June Scroggin, All Rights Reserved
I sent each of them a special invitation I made on my computer using a wedding invitation kit found on clearance at A.C. Moore. The seashell theme works for my beach/house party just as well as for a wedding itself.

© Dub Scroggin, All Rights Reserved
When thinking of a gift for my sorority sisters when they came, I thought a glass vase acid-etched with our sorority’s letters would be perfect as place settings at the table, especially when filled with flowers. Flowers always make people happy.

© Dub Scroggin, All Rights Reserved
Some blue glass beads and Windex were put in the vase so you could see the finished etching better. I crafted my own stencil by printing the size Greek letters I wanted onto paper, tracing them onto white contact paper, and the carefully cutting out the stencil with a craft knife. The glass vases were purchased at A.C. Moore on sale.

© June Scroggin, All Rights Reserved
The scrapbook project was actually done years ago before I moved to Florida. I ordered a scrapbook for each of us to document our adventures together and had each one inscribed. We all have a special “sister” name; naturally, I am Sister Junie Moon as that’s what I’ve been called for numerous years.

© June Scroggin, All Rights Reserved
Scrapbooking our shared experiences makes for wonderful memories. When we are truly so old we can’t hobble about wreaking merry mayhem together, we can always look back on the fun we had.

© June Scroggin, All Rights Reserved
To keep paperwork together, I purchased Martha Stewart cases and stenciled those as well. We stick bits of souvenirs, tickets, meeting programs, invitations, postcards, or whatever in the case until we can put our little memories in our scrapbook.

© June Scroggin, All Rights Reserved
I love thinking of little projects like these I’ve shared with you today and over the years on my blog. Not only does it make me happy to do something creative, it gives me great joy to gift people.

Tuesday, January 21, 2014

Rolling Along Julia Child’s Way

Three years ago, I read about Julia Child and her rolling pins. She favored a no-handled pin made of hard wood such as maple about 18-inches in length and a diameter of about 1 3/4 inches. Around the same time, my friends and I were taking a series of classes where we learned special cooking or baking skills from each other. One of those classes was for making donuts and other assorted goodies. On the supply list was bringing a rolling pin.

Source: Unknown
Remembering Julia and her rolling pin, I set about finding one and then decided I’d simply make a pin using Julia's specifications. That thought led to the idea of making a pin to gift each of my friends attending the baking class. Not having any previous wood workshop experiences other than some minor efforts with my dad, I ordered lengths of unfinished solid maple from a wood company and asked my friend Paula’s husband Sam to help me as he has every tool known to man. The following pictures show my progress.

© June Scroggin, All Rights Reserved
To add a small note of grace, I personalized the pins by stamping each attendee’s initials into one end of the pin with a metal alphabet stamp set attached to a wood-burning tool to finish it off.

© June Scroggin, All Rights Reserved
Sam was such a sweetheart to help me with this effort. I learned so very much from him and am grateful for his willingness to do this and his patience.

© June Scroggin, All Rights Reserved
The final step involved using a special sealant made for wood items that come in contact with food.

© June Scroggin, All Rights Reserved
Since a dish towel was also on the supply list, I tied a new dish towel around each pin.

© June Scroggin, All Rights Reserved
Here are my friendship gifts—I loved this project and think Julia Child would have approved.

© June Scroggin, All Rights Reserved
The class itself was so much fun and we made all sorts of yummy treats: maple bars, donuts, and so on. The series of classes/workshops helped us learn more about each other and the amazing skills each woman has to offer.

© June Scroggin, All Rights Reserved
I miss my friends back in Tucson—they are such awesome people! Maybe I ought to start a similar sort of group effort here with my new friends as they all have skills in a variety of ways, too.

© June Scroggin, All Rights Reserved
And these are the homemade cinnamon rolls I recently made using my own special rolling pin.

Friday, January 3, 2014

Note to Self

Pinterest has become my go-to source for ideas lately—more so than Google. Probably, it is because I save my little Pinterest jaunts until late at night when I’m too tired to do anything else but look at pictures. Many DIY pins have made it to my own Pinterest board for safe-keeping.

© June Scroggin, All Rights Reserved
One such pin was for making a dry-erasable board. The original black-and-white inspiration project was made as a teacher-appreciation gift and shared on Classroom CollectiveI decided to make a more colorful version.

© June Scroggin, All Rights Reserved
I bought a white standing picture frame to accommodate an 8.5x11-inch piece of paper , designed and printed my own notebook paper using pink paper, hot glued a bow I made, and there it was—my own board for writing notes to myself.

Super quick, very easy, and almost as fast a bit of instant gratification as looking at stuff on Pinterest.

Monday, May 16, 2011

Beach Time and a Monogram

Summer has begun for me. The following picture shows the beach I lounge about on as though I truly am Chief Mermaid of All the Seas. The sand really is this white and the color of the water is why this section of Florida is called the Emerald Coast.

© June Scroggin, All Rights Reserved


Anyway, I happened upon a project idea at Let The Tide Pull Your Dreams Ashore blog that looked like fun but also has a rather practical purpose—well, to me it’s practical. Monogram your beach water jug.
After an unsuccessful search locally for a pink ½-gallon Igloo jug, I ordered one from Dick’s Sporting Goods. My green monogram was ordered from 2PreppyGirls. Both items arrived fairly quickly and the project itself took me a grand total of thirty seconds to finish.

© June Scroggin, All Rights Reserved


Here is my monogrammed jug’s beach debut. The pink-and-green theme is rather perky—which is more than I can say of myself after putting on my swimsuit. Ah well, one of the best things about going to the beach is the feeling that all is well in the world and your troubles can just slip away with the tide.
Resources

Wednesday, April 27, 2011

Blocking Wires Kit

My blocking wires are still in Tucson. One of these days, my husband and I will manage to get all my stuff here. In the meantime, I need the wires to block some of my finished knitting projects. Instead of buying a new set, I decided to make my own blocking wires using wires purchased at a local welding shop.

© June Scroggin, All Rights Reserved


I cut some wires in 36-inch lengths and some 18-inches long. There’s more to the process of making the wires, but you can find free tutorials online and there’s no sense in my repeating someone else’s work. A box of T-pins and a yardstick were added to my arsenal of blocking tools.

© June Scroggin, All Rights Reserved


In order to keep the wires from getting bent and to provide a way to store them, I sewed flannel bags with a twill hanging strap.

Source: Amazon.com


Interlocking play mats found at Lowe’s work great as my blocking pads. The mats may also be found at Amazon.com


Monday, April 25, 2011

Pottery Yarn Bowl Project

I’ve been admiring beautiful pottery bowls being made to hold knitting yarn. Thoughts about purchasing one flitted through my head until it dawned on me such a project would make for a great learning adventure. I immediately signed up for classes in handbuilt pottery at Full Circle Gallery.


© June Scroggin, All Rights Reserved


This photo depicts me putting clay through a press to get the shape and thickness needed.


© June Scroggin, All Rights Reserved
One of my bowls in process.


© June Scroggin, All Rights Reserved


After drawing a freehand spiral, I carefully cut it out. Looking at the picture, I realize the spiral is more like the letter “J”. Hah—it’s a Junie Moon bowl!


© June Scroggin, All Rights Reserved


The bowl is going on the shelf to await glaze firing.


© June Scroggin, All Rights Reserved


Here’s my first bowl. It’s a tad lopsided and has a rather wacky rim, but it will work.


© June Scroggin, All Rights Reserved


More bowls are in process to use as gifts—hopefully more uniform in shape as I gain in experience. Working with clay has proven to be a good way to relieve stress and give me something to do to stay out of mischief.


Friday, April 8, 2011

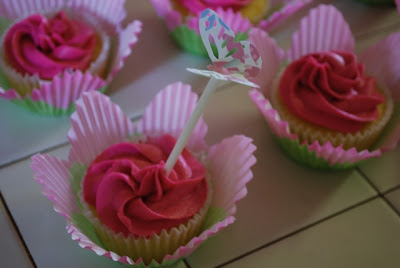
Spring Cupcakes

Our college hosted two visiting poets this week: Kathleen Sheeder Bonanno and Frank X Walker. In addition to events surrounding their work, a reception was held last night featuring readings of works by students published in this year’s college literary magazine.


© June Scroggin, All Rights Reserved


When asked to bake cupcakes for the event, I envisioned butterflies flitting above flower cupcakes. So butterflies were made using one of Martha Stewart’s punches.


© June Scroggin, All Rights Reserved


I glued each butterfly onto a 4.5-inch lollipop stick, bending the butterfly wings slightly to emulate flight.


© June Scroggin, All Rights Reserved
Wilton’s flower cups are lovely, but do not bake in them as the sides spread and lose their form. I baked lemon cupcakes in plain white baking cups and inserted them into the flower cups later.


© June Scroggin, All Rights Reserved


Vanilla-flavored buttercream frosting was made and piped on using a 1M tip. The color is a combination of Wilton’s Rose and Burgundy coloring gels.


© June Scroggin, All Rights Reserved


My test cupcake—I quite like how it looks.


© June Scroggin, All Rights Reserved


The cupcakes were packed in Cupcake Couriers and the butterflies ensconced in a large mug to carry to the event site in another town. I drove over there about an hour before the event, set out the cupcakes, inserted the butterflies, and zipped back to my town to teach a class. I hope the attendees liked my springtime offering.