Monday, August 31, 2009

Making 2010 Desk Calendars

Here it is the last day of August. The days and months are really flying by this year. I’m thinking about Christmas and the approach of 2010. Right now my focus is on new calendars, so I took a class last Thursday at Making Memories to learn how to make a standing desk calendar.


© June Scroggin, All Rights Reserved

While most people choose a monthly theme representing the particular month, mine is the beach, something always on my mind year ‘round here in the arid climate of Tucson. Although this calendar is for me, I’m also making gift versions using family photographs.


© June Scroggin, All Rights Reserved

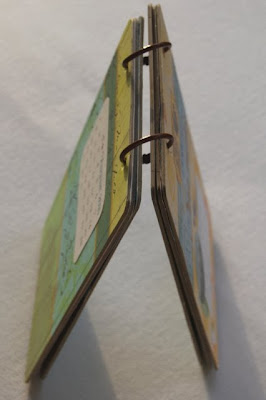
The calendar is 9.75-inches tall by 5.5-inches wide. You insert two metal rings in the top to bind it. The chipboard pages make the calendar easy to stand.


© June Scroggin, All Rights Reserved

These are the six sections depicting January through June.


© June Scroggin, All Rights Reserved

On the other sides are the months of July through December.


© June Scroggin, All Rights Reserved

To make this calendar, I purchased Creative Imaginations’ Bare Elements Conrad Ring Book kit containing 6 chipboard pages and 2 metal rings. I chose various beach-themed scrapbook papers and a few associated embellishments, and switched out the silver-colored rings for brown colored ones which work better for my project.

The monthly calendar pages are a free download here (only available temporarily, so get it while you can). Cut them out to use for the project.

You make each calendar page in a specific order as follows:

Page 1: January on one side, December on the reverse
Page 2: February on one side, November on the reverse
Page 3: March on one side, October on the reverse
Page 4: April on one side, September on the reverse
Page 5: May on one side, August on the reverse
Page 6: June on one side, July on the reverse

When you finish all the pages, simply put them in order, slip in your rings, and you're done.

Saturday, August 29, 2009

Helping Other Women

I discovered a way to help the breast cancer cause each and every day simply with a click of my mouse. It doesn’t cost me anything but a few seconds of my time to do a good deed.

The Breast Cancer Site

The Breast Cancer Site sponsors free mammograms for women in need through charitable partners. Every time we click (once a day per person), we help fund this service. Here's the web site.


Source: The Breast Cancer
Site

Get your mammogram—it could save your life!

Friday, August 28, 2009

Blessings Friday: Tasha Tudor Day

Some people quietly tuck themselves in the little nooks and crannies of the world, leading lives unnoticed by anyone else. Many folks live in deliberately dramatic ways fostering rabid curiosity about who they are and what they’ll do next. And then there are individuals who transcend all levels and serve as inspirational beacons of light—such was Tasha Tudor.

Today Storybook Woods hosts a tribute to the remarkable and inspirational life led by Tasha Tudor. It’s Tasha Tudor Day.


Tasha Tudor’s legacy is one of self-reliance and determination to live life as she chose. From sustaining her family through gardening, to creating a home where work was not a four-letter word avoided at all costs, to illustrating quiet images of childhood imagination, Tasha Tudor lived simply and resolute in her choices.


If one advances confidently in the direction of his dreams, and endeavors to live the life which he has imagined, he will meet with a success unexpected in common hours. ~ Henry David Thoreau
Thoreau’s words were oft-quoted by Tasha Tudor and she lived life accordingly, thereby serving as an inspiration for all of us. It’s not my aspiration to be another Tasha Tudor or even a Thoreau, but both prompt me to be mindful of deciding how I want to live my own life.

Resources

  • Click here for a collector’s checklist of Tasha Tudor’s published works—there may be a title or two you missed over the years.
  • You can visit The Tasha Tudor Museum’s first online exhibition here until December 31, 2009.

Thursday, August 27, 2009

Daring Bakers: Dobos Torta

The August 2009 Daring Bakers' challenge was hosted by Angela of A Spoonful of Sugar and Lorraine of Not Quite Nigella. They chose the spectacular Dobos Torte based on a recipe from Rick Rodgers' cookbook Kaffeehaus: Exquisite Desserts from the Classic Caffés of Vienna, Budapest, and Prague.

Dobos Torta (or Torte)

The Dobos Torta is a five-layer sponge cake, filled with a rich chocolate buttercream and topped with thin wedges of caramel. It was invented in 1885 by József C. Dobos, a Hungarian baker, and rapidly became famous throughout Europe for both its extraordinary taste and its keeping properties. The recipe was a secret until Dobos retired in 1906 and gave the recipe to the Budapest Confectioners' and Gingerbread Makers' Chamber of Industry, providing that every member of the chamber can use it freely.


© June Scroggin, All Rights Reserved

Note: Normally, the caramel wedges are placed opposite the way I have them on my torta.

Equipment

  • 2 baking sheets
  • 9” (23cm) spring-form tin and 8” cake tin, for templates
  • mixing bowls (1 medium, 1 large)
  • a sieve
  • a double boiler (a large saucepan plus a large heat-proof mixing bowl which fits snugly over the top of the pan)
  • a small saucepan
  • a whisk (you could use a balloon whisk for the entire cake, but an electric hand whisk or stand mixer will make life much easier)
  • metal offset spatula
  • sharp knife
  • a 7 1/2” cardboard cake round, or just build cake on the base of a spring-form tin
    piping bag and tip, optional
Prep Times

  • Sponge layers: 20 mins prep, 40 mins cooking total if baking each layer individually
  • Buttercream: 20 mins cooking. Cooling time for buttercream: about 1 hour plus 10 minutes after this to beat and divide
  • Caramel layer: 10-15 minutes
  • Assembly of whole cake: 20 minutes
Sponge Cake Layers

  • 6 large eggs, separated, at room temperature
  • 1 1/3 cups (162g) confectioner's (icing) sugar, divided
  • 1 teaspoon (5ml) vanilla extract
  • 1 cup plus 2 tablespoons (112g) sifted cake flour (SUBSTITUTE: 95g plain flour + 17g cornflour {cornstarch} sifted together)
  • pinch of salt
Chocolate Buttercream

  • 4 large eggs, at room temperature
  • 1 cup (200g) caster (ultrafine or superfine white) sugar
  • 4oz (110g) bakers chocolate or your favorite dark chocolate, finely chopped
  • 2 sticks plus 2 tablespoons (250g) unsalted butter, at room temperature
Caramel Topping

  • 1 cup (200g) caster (superfine or ultrafine white) sugar
  • 12 tablespoons (180 ml) water
  • 8 teaspoons (40 ml) lemon juice
  • 1 tablespoon neutral oil (e.g. grapeseed, rice bran, sunflower)

Finishing Touches

  • a 7” cardboard round
  • 12 whole hazelnuts, peeled and toasted
  • ½ cup (50g) peeled and finely chopped hazelnuts
Directions for the Sponge Layers

NB. The sponge layers can be prepared in advance and stored interleaved with parchment and well-wrapped in the fridge overnight.
  1. Position the racks in the top and centre thirds of the oven and heat to 400F (200C).
  2. Cut six pieces of parchment paper to fit the baking sheets. Using the bottom of a 9" (23cm) spring-form tin as a template and a dark pencil or a pen, trace a circle on each of the papers, and turn them over (the circle should be visible from the other side, so that the graphite or ink doesn't touch the cake batter.)
  3. Beat the egg yolks, 2/3 cup (81g) of the confectioner's (icing) sugar, and the vanilla in a medium bowl with a mixer on high speed until the mixture is thick, pale yellow and forms a thick ribbon when the beaters are lifted a few inches above the batter, about 3 minutes. (You can do this step with a balloon whisk if you don't have a mixer.)
  4. In another bowl, using clean beaters, beat the egg whites until soft peaks form. Gradually beat in the remaining 2/3 cup (81g) of confectioner's (icing) sugar until the whites form stiff, shiny peaks. Using a large rubber spatula, stir about 1/4 of the beaten whites into the egg yolk mixture, then fold in the remainder, leaving a few wisps of white visible. Combine the flour and salt. Sift half the flour over the eggs, and fold in; repeat with the remaining flour.
  5. Line one of the baking sheets with a circle-marked paper. Using a small offset spatula spread about ¾ cup of the batter in an even layer, filling in the traced circle on one baking sheet. Bake on the top rack for 5 minutes, until the cake springs back when pressed gently in the centre and the edges are lightly browned. While this cake bakes, repeat the process on the other baking sheet, placing it on the centre rack. When the first cake is done, move the second cake to the top rack. Invert the first cake onto a flat surface and carefully peel off the paper. Slide the cake layer back onto the paper and let stand until cool. Rinse the baking sheet under cold running water to cool, and dry it before lining with another parchment. Continue with the remaining papers and batter to make a total of six layers. Completely cool the layers. Using an 8" spring-form pan bottom or plate as a template, trim each cake layer into a neat round. (A small serrated knife is best for this task.)
Directions for the Chocolate Buttercream

NB. This can be prepared in advance and kept chilled until required.
  1. Prepare a double-boiler: quarter-fill a large saucepan with water and bring it to a boil.
  2. Meanwhile, whisk the eggs with the sugar until pale and thickened, about five minutes. You can use a balloon whisk or electric hand mixer for this.
  3. Fit bowl over the boiling water in the saucepan (water should not touch bowl) and lower the heat to a brisk simmer. Cook the egg mixture, whisking constantly, for 2-3 minutes until you see it starting to thicken a bit. Whisk in the finely chopped chocolate and cook, stirring, for a further 2-3 minutes.
  4. Scrape the chocolate mixture into a medium bowl and leave to cool to room temperature. It should be quite thick and sticky in consistency.
  5. When cool, beat in the soft butter, a small piece (about 2 tablespoons/30g) at a time. An electric hand mixer is great here, but it is possible to beat the butter in with a spatula if it is soft enough. You should end up with a thick, velvety chocolate buttercream. Chill while you make the caramel topping.

Lorraine's note: If you're in Winter just now your butter might not soften enough at room temperature, which leads to lumps forming in the buttercream. Male sure the butter is of a very soft texture I.e. running a knife through it will provide little resistance, before you try to beat it into the chocolate mixture. Also, if you beat the butter in while the chocolate mixture is hot you'll end up with more of a ganache than a buttercream!

Directions for the Caramel Topping
  1. Choose the best-looking cake layer for the caramel top. To make the caramel topping: Line a jellyroll pan with parchment paper and butter the paper. Place the reserved cake layer on the paper. Score the cake into 12 equal wedges. Lightly oil a thin, sharp knife and an offset metal spatula.
  2. Stir the sugar, water and lemon juice in a small saucepan. Bring to a boil over a medium heat, stirring often to dissolve the sugar. Once dissolved into a smooth syrup, turn the heat up to high and boil without stirring, swirling the pan by the handle occasionally and washing down any sugar crystals on the sides of the pan with a wet brush until the syrup has turned into an amber-colored caramel.
  3. The top layer is perhaps the hardest part of the whole cake so make sure you have an oiled, hot offset spatula ready. I also find it helps if the cake layer hasn't just been taken out of the refrigerator. I made mine ahead of time and the cake layer was cold and the toffee set very, very quickly—too quickly for me to spread it. Immediately pour all of the hot caramel over the cake layer. You will have some leftover most probably but more is better than less and you can always make nice toffee pattern using the extra to decorate. Using the offset spatula, quickly spread the caramel evenly to the edge of the cake layer. Let cool until beginning to set, about 30 seconds. Using the tip of the hot oiled knife (keep re-oiling this with a pastry brush between cutting), cut through the scored marks to divide the caramel layer into 12 equal wedges. Cool another minute or so, then use the edge of the knife to completely cut and separate the wedges using one firm slice movement (rather than rocking back and forth which may produce toffee strands). Cool completely.

Assembling the Dobos


© June Scroggin, All Rights Reserved
  1. Divide the buttercream into six equal parts.
  2. Place a dab of chocolate buttercream on the middle of a 7½ ” cardboard round and top with one cake layer. Spread the layer with one part of the chocolate icing. Repeat with 4 more cake layers. Spread the remaining icing on the sides of the cake.
  3. Optional: press the finely chopped hazelnuts onto the sides of the cake.
  4. Propping a hazelnut under each wedge so that it sits at an angle, arrange the wedges on top of the cake in a spoke pattern. If you have any leftover buttercream, you can pipe rosettes under each hazelnut or a large rosette in the centre of the cake. Refrigerate the cake under a cake dome until the icing is set, about 2 hours. Let slices come to room temperature for the best possible flavor.

Storage

Store this cake at room temperature under a glass dome, but your mileage may vary. If you do decide to chill it, then use a glass dome if you have one. Note: the cake will cut more cleanly when chilled.


© June Scroggin, All Rights Reserved

Oh, what a tasty treat this turned out to be. Thank you Angela and Lorraine!If you’d like to be a Daring Baker or Cook, visit the Daring Kitchen here and you can find more information here. I’m certainly learning a lot by participating.

Wednesday, August 26, 2009

Perpetual Wood Block Calendar

They say that time changes things, but you actually have to change them yourself ~ Andy Warhol


© June Scroggin, All Rights Reserved

I’ve wanted a wood block perpetual calendar but really had no interest in cutting the wood pieces. So I found a blank set on Etsy to decorate myself. Some 7 Gypsies paper found at Making Memories here in Tucson fit in my plan perfectly as I sought quiet colors since it’s nice to have quiet time even if only in the form of paper.


© June Scroggin, All Rights Reserved

Each unfinished wood section was carefully measured after which I cut out my paper pieces. Then I used Mod Podge to adhere the paper to the wood.

Updated 9/24/09: I should have told you what numbers go on each block; here is that information:

  • Block 1: : 0, 1, 2, 3, 4, 5
  • Block 2: 0, 1, 2, 6, 7, 8 (the six also serves as a 9 if you flip it over)


© June Scroggin, All Rights Reserved

A set of clear stamps found at Making Memories worked for marking each month on the sides of the long block sections. All told, the project took me maybe 45 minutes yesterday afternoon to complete and I’m happy with the outcome.

To return to my opening quote, Andy Warhol was semi-right. I can change both time and events myself—even if it’s merely turning the wood blocks on my new perpetual calendar.

Resources

Tuesday, August 25, 2009

Lùban air an Drochaid: Stitching on the Bridge

My scarf contribution for the Stitches on the Bridge Project is done. Today I’m mailing it off to Scotland. The project is organized by Luib na Lùban (In Amongst the Stitches), a new textile art group in the Lochalsh and Skye area in the Scottish West Highlands. It's part of the Scotland Homecoming 2009 celebrations.


© June Scroggin, All Rights Reserved

This is one of the charitable projects I wrote about last week. My scarf will be added to other knit or crochet pieces to cover the ramparts on Skye Bridge. Afterwards, the textile components will be sold to raise money for charity.
  • Yarn: Cascade Yarns Bollicine, color is Dolly #908 (4 balls)
  • Needles: 13 (9mm)
  • Pattern: Holding 2 strands, cast on 30 stitches and knit until you reach a length of 78 inches
  • Finished Size: 14 inches wide by 78 inches long


My contribution is in loving memory of my mother, a direct descendent of Clan Sutherland. She would have been so tickled to know about this project. I miss her so very much.


© June Scroggin, All Rights Reserved

I made a wrap-around label using glossy presentation paper, cutting it down the middle lengthwise. One side features Clan Sutherland and the other provides the requested information for my scarf offering. My contact info was blurred with a photo editor only for this post.

Resources

Monday, August 24, 2009

The Butterfly Project and Tutorial

Last Thursday I told you about Holocaust Museum Houston’s effort to collect 1.5 million handmade arts-and-crafts butterflies in remembrance of all the children who died in the holocaust. The butterflies will form an exhibition scheduled for 2012 in remembrance of all the children who died in the holocaust.


© June Scroggin, All Rights Reserved

My paper butterfly project is finished and ready to send to the museum. I used scrapbook materials to make a layered butterfly to give it dimension and a sense that its wings are moving. The finished size is 4½-inches wide by 3½ inches.

If you’d like to participate in the museum’s effort to remember the little ones lost in the holocaust, you can find more information here.

Paper Butterfly Tutorial

You can access a printer-friendly PDF version of my tutorial (includes the butterfly shape templates) here or in my side bar.

Supplies

  • 1 piece double-sided printed cardstock (I used American Crafts’ Spring & Summer English Garden #34457, one side a butterfly print design, the other side solid)
  • 1 piece of chip board or a pre-cut chip board butterfly shape
  • Scissors
  • Butterfly paper punch
  • Ruler
  • Pencil
  • Bone folder
  • Mod Podge
  • Small disposable foam paintbrush
  • Small foam sticky squares
  • Butterfly template, click on the picture below to enlarge and print:

© June Scroggin, All Rights Reserved

Directions

Step 1: From your double-sided scrapbook paper, cut out 3 large butterflies and 1 small butterfly (total of 4 butterfly shapes). Cut 1 large butterfly from the chip board.


© June Scroggin, All Rights Reserved

Step 2: Using Mod Podge, adhere one large butterfly cardstock piece to one side of the chip board. Flip the chip board butterfly over and adhere the reverse side of your cardstock piece so you have one side with the print design and the other with the solid. See following 3 pictures. When done, set aside this piece for now.


© June Scroggin, All Rights Reserved


© June Scroggin, All Rights Reserved


© June Scroggin, All Rights Reserved

Step 3: Adhere the small butterfly to the third large butterfly shape using Mod Podge to make your winged layer.


© June Scroggin, All Rights Reserved

Step 4: Punch butterfly shapes around the outer edge of the butterfly.


© June Scroggin, All Rights Reserved


© June Scroggin, All Rights Reserved

Step 5: Find the center of the winged butterfly layer and run bone holder from one end to the other.


© June Scroggin, All Rights Reserved

Step 6: Gently bend the wings of your butterfly up along the creased line.


© June Scroggin, All Rights Reserved

Step 7: Cut the small foam sticky squares in half. You only need 3 small pieces.


© June Scroggin, All Rights Reserved

Step 8: Attach the foam squares to the print design sign of you winged butterfly layer.


© June Scroggin, All Rights Reserved

Step 9: Center the winged layer over the base butterfly layer. Gently press to adhere. You’re done.


© June Scroggin, All Rights Reserved

Please do not use my tutorial to make items for commercial sale.

Friday, August 21, 2009

Blessings Friday: Tucson's Birthday and Penny Collecting

Yesterday was Tucson’s birthday. For the month of August, lucky residents and visitors get to enjoy celebrations honoring Tucson’s unique history, culture, and natural wonders—and most of it is free. We took advantage of yesterday’s free admission to Reid Park Zoo for our walking adventure.


Besides the requisite lions, tigers, and bears (oh my), we saw other animals—some we were allowed to touch which is really neat. To be honest, I didn’t go anywhere near the snakes they had out for us to touch.


© June Scroggin, All Rights Reserved

This little guy is a Bearded Dragon. He can bite, but he’s not poisonous. The color gradations on his beard are extraordinary. I thought he was kind of cute.


© June Scroggin, All Rights Reserved

This giant tortoise was munching on veggies, what a good diet he follows.


© June Scroggin, All Rights Reserved

This is a new activity Cindy and I just discovered. It started at Colossal Cave the other day on our hike. There was a penny machine that smashes your penny into the shape seen above and imprints various illustrations associated with the site you’re visiting.

We discovered there are many such machines around the world. Cindy and I purchased collector books and are now running around Tucson like crazy women finding the machines. You ought to see us as we enthusiastically crank those machines. We collected 12 new penny impressions from the machines at the zoo. There’s a web site about collecting the pennies and where to find the machines. What a fun and relatively inexpensive souvenir collection to enjoy with your kids, too.

Resources

Thursday, August 20, 2009

Charitable Crafting Opportunities

Here are a couple of the charitable projects I’m working on right now in case you’re interested in joining these efforts.

Stitches on the Bridge


Source: Stitches on the Bridge project

Homecoming Scotland 2009 celebrates the 250th anniversary of Robert Burns’ birth as well as Scotland’s rich culture and heritage. I’m contributing towards this to honor my family’s heritage.

Stitches on the Bridge is an effort to cover Skye Bridge with knit or crocheted scarves of specific dimensions as part of Homecoming Scotland celebrations. Skye Bridge links the Isle of Skye with the mainland in the West Highlands of Scotland. The panels will be installed on the bridge on Oct. 22 and dismantled on Oct. 26. All items made will be sold to raise money for local charities and community groups.

Deadline: September 25, 2009 (your project must be received by this date at the latest)

Information and Guidelines: Stitches on the Bridge project

The Butterfly Project: Holocaust Museum Houston


Source: Holocaust Museum Houston

Holocaust Museum Houston is collecting 1.5 million handmade arts-and-crafts butterflies to form an exhibition scheduled for 2012 in remembrance of all the children who died in the holocaust.

Deadline: June 30, 2011

Information and Guidelines: The Butterfly Project

Other Opportunities

If you’re looking for other charitable projects, here are a few resources to explore:

Wednesday, August 19, 2009

Colossal Cave Mountain Park

Although I’ve experienced a lot in Tucson, there’s much I’ve missed. My hiking expeditions are proving a wonderful way to explore. You view things from a different and fresher perspective when on foot rather than driving by in a car.


Source: Colossal Cave Mountain Park

Yesterday my friend/neighbor Cindy and I hiked Pima County’s Colossal Cave Mountain
Park in the Rincon Mountains, about 10 miles from our subdivision. This park is on the National Register of Historic Places and encompasses 2,400-acres. Major features are Colossal Cave and La Posta Quemada Ranch, a 128-year-old working ranch.

Discovery Tour


© June Scroggin, All Rights Reserved

We picked up the self-guided discovery tour map at the entrance. You visit 18 different stations around the park, punching the icon at each station, and then take your completed map to one of the gift shops to get a prize. We visited all 18 stations and were rewarded with our choice of polished gem stones. It’s a great way to discover the park.

Path of the Ancestors Archaeology Trail


© June Scroggin, All Rights Reserved

The trail we explored is the Kekelbada Ha-Wo:gga, Path of the Ancestors Archaeology Trail
. Don’t you just love that name? Sometime around 900 A.D., the Hohokam Indians walked here. Walking in their ancient footsteps makes me wonder what they thought as they journeyed the same path.

Analemmatic Sundial


© June Scroggin, All Rights Reserved

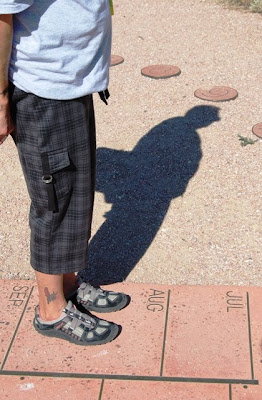
The park has an analemmatic sundial, different from the usual round version known as an equatorial sundial. The analemmatic sundial uses a central calendar grid and an ellipse showing the hours.


© June Scroggin, All Rights Reserved

The gnomon, a vertical rod or pin, is used to tell the time in equatorial sundials. However, in an analemmatic sundial, you yourself serve as the gnomon. In my photo, Cindy stands on the August section and her shadow marks us at this section of the park at 9 a.m.

Civilian Conservation Corps Museum


© June Scroggin, All Rights Reserved

This 1930s adobe Park Service building was built and used by the CCC as the office for the Colossal Cave Project and is dedicated the men of Camp SP-10-A. Inside we read actual camp newsletters and listened to a 1937 radio interview with Robert Fechner, National Director of the CCC at the time.

There’s more to explore at the park as well as the famous cave itself, but we’ve decided to pursue those another day. Arizona’s state motto is Ditat Deus (God Enriches)—I think that’s true of any place if only we take time to notice.

Resources

  • Civilian Conservation Corps Legacy
  • Colossal Cave Mountain Park
  • North American Sundial Society