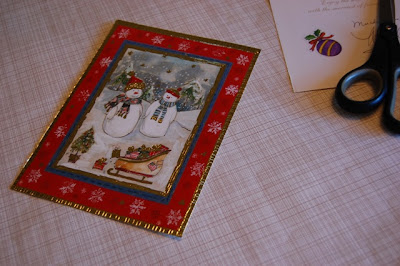
Kari and Kijsa, hosts of the amazing Ask Kari & Kijsa blog saw my recent Origami card box post and requested that I provide a tutorial. So here is a way to recycle your holiday cards.
Once you make just one box, the process will go very quickly for making more. You can use them for small gifts or treats, or maybe even as little advent boxes for next Christmas.
If you prefer a PDF version, please click on the link in the Junie Moon Tutorials in the right-hand column.
Note: your end-result box size is essentially determined by your greeting card size.
Materials

- Old (or new) greeting card—we will use a rectangular card for this tutorial
- Pencil
- Ruler
- Sharp scissors
- Tape or glue
Cut the front of the card away from the back section.

Put the back (inside message) part of your card to the side for now. We will work with the card front first.

Step 2
Lightly draw a line from one corner on the back of the front cover of the card. I’ve made my lines dark so you can see them.


See where the lines cross in the middle? I’ve made a heavy dot in the middle so you can see it.
Step 3
Fold each long side of your card piece towards the middle point but not on it. Then unfold.

Repeat the same instructions for the short ends of your card.
Step 4
On the short ends of each side, mark and then cut up to where the line runs diagonally across and meets the fold as illustrated below.

It should look like this.

Step 5
Fold each short-end side tab up and in towards each other like this. Tape or glue in place.

Perform this step for both box ends.

Step 6
Now fold the remaining short-end tab up and over the two side tabs you just secured. Tape or glue in place.

Do the same for the other box end.

You now have the top of your box completed; set it aside and make the box bottom.
Step 7
Using the reserved card piece, repeat Step 2.
Step 8
Now repeat Steps 3 and 4 except fold the ends up to the middle point as illustrated below.

Step 9
Now repeat Steps 5 and 6 to finish your box bottom.

The Result
You now have a box top and bottom—fill it with something scrumptious.

Note: You can erase your lightly-penciled guidelines if you so desire.

24 comments:
What a great way to use the Christmas cards! Thanks for the tutorial!
thanks for sharing. super cute idea!!!
happy new years!
jessi
Awesome! I was going to ask you how you did it, but you beat me to it. Thanks, June.
Thanks so much Junie, for this turtorial -I am making some of these :)
Happy Sunday :)
crystalxo
Thanks so much! Just yesterday I was cleaning up some of the Christmas things and thought it would be nice if I knew something I could do with all the Christmas cards. Now I do, make sweet little boxes!
Brilliant! This is so practical and simple. Thank you for sharing your bright idea here!
~Jody
What a GREAT idea for recycling Christmas cards! Most of the cards we got this year were photocards, but we do have a few traditional cards, so I'll have to give it a try.
I feel so selfish. I was going to do a tutorial on my little booklets, but since I'm selling them I now feel like the method is a "trade secret" (even though it isn't exactly rocket science). So I don't think it is in the interest of my "business" to give away the method.
BTW, do you have any secrets on how to get people to read and comment on your blog? I love my loyal and beloved commenters, but the more the merrier!
Great idea!
Thanks for the directions.
Happy New Year!
Rosemary
Way fun...the tutorial is brilliant! Love the step by step...we will have so much fun making these...you are the very best!
smiles, kari and kija
Very, Very clever June! Love the idea!
This such a neat idea TFS your tutorial!!!
Hi there,
What a great idea! Found you through Kari & Kijsa, and I'm so glad I did. Love your blog! Have a happy new year!
xoxo,
Mary
Wow - great tutorial! What an awesome idea!
June, these are fabulous - I'm off to try one now!
Very clever! Love this idea~!I might have to do it with Birthday cards too!
Jen R
How clever! I have made little gift boxes out of card stock & paper, but have never thought of recycling cards this way. Thanks for the brilliant idea!
Hi there,
what a clever idea. stumbled across your blog through kari and kijsa's.
Wishing you a happy new year. Cheers to 08'
Adla
So clever! I love this idea. Nicely done.
I love this! Thank you for the toot!
Had to comment again... I was so excited I had to try this right now! I love this!!!!
I love your little boxes, and I've made one but I have one suggestion to make. The bottom of the box would fit better if it was cut a wee bit smaller before folding. I haven't tried it but our lid was difficult to put onto the bottom.
Very nice... Adding to my list. I hope I can get around to this one.
great stuff. very nice of you to include pics.
i to love origami and set up a lens at squidoo.. come check it out.
How To Make Origami Balls
Thanks for sharing that, I can't wait to see some more!....
Thanks
John
How to make Origami Balls
Post a Comment